Introduction
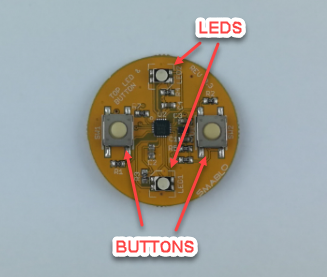
Smablo Top LED and Button Shield is equipped with two buttons and 2 RGB LEDs. You can use as a controller with two buttons and display status using 2 RGB LEDS.
Applications
Top led and button shield can be used as a display module and control module for all kinds of applications indicating they state and with LEDs and making simple settings with 2 buttons for example for:
- Smart home status devices
- Agriculture devices
- Smart cities
- Wearables
- Etc.
Getting started
To get started with Smablo Top LED and button shield you will need:
- Smablo Development Board
- Top LED and Button Shield
- Smablo CPU
- Smablo SDK
- Visual Studio Code
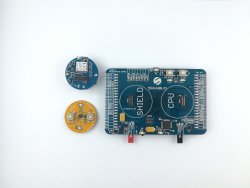
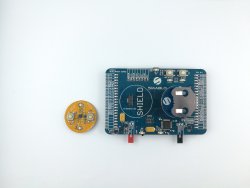
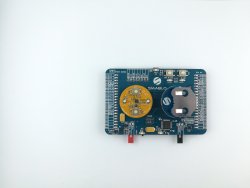
Take Smablo development board from your Smablo Development kit and place CPU and Smablo Top LED and Button shield on the described connectors like in the pictures and video below:
 {.force-inline}
 {.force-inline}
 {.force-inline}
When you’ve done connecting Shields you can connect Smablo Development board to your computer with USB cable.
Example programs
To show you how to interact with Smablo top LED and Button shield open Visual Studio Code and from your Smablo SDK example directory and open app_top_led like it was shown at the video below:
If you will scroll down to the bottom of the app_top_led_demo.c file you will see main configuration function called demo_app_top_led which contains 4 demo functions:
1. sequential_blink
The sequential_blink() example will blink with all colors sequentially on both shield LEDS. If you want to go to the definition of the sequential blink example you can press F12 button just like it was shown on the video below:
To see how the sequential_blink() example works compile and program CPU Shield using F5 button just like it was shown in the video below:
And as the result on the app top led shield we should see LEDs blinking like on the video below:
2. set_color
To see other examples you can comment sequential_blink() function and uncomment another for example set_color and then press the F5 button.
set_color() function shows you how to set blue color on the shield LEDs. To use it uncomment the function and follow the instructions on the videos below:
To see how the set_color() example works compile and program CPU Shield using F5 button just like it was shown in the video below:
3. button_color_change
Next button_color_change() example shows how to interact with on shield buttons.
Our example will change the LEDs color when the appropriate button is pressed. To see how it works run our example by pressing F5 button and after compilation click run button on the top of the screen. Just like in the video below:
Video button_color_change
And now every time we press the buttons the colors of the LEDs will change.
4. led_configuration
Last led_configuration() example code shows how to use more complex LEDs feature. We can make LEDs to blink and fade on their own without CPU control.
To use it uncomment the function as it was shown in the video below:
As a result the LEDS will fade with blue color just like on the video below:
Minimal code
Minimal example code will show you how to program with Smablo Shields an app_top_led library. You should always program you projects in this sequence.
#include "app_top_led.h"
void example_func(void)
{
    app_top_led_init();
    app_top_led_configure_led_state(APP_TOP_LED_0,APP_TOP_LED_G,APP_TOP_LED_ON );
    app_top_led_commit_blocking();
}
It's illustrating how you should program with Smablo app_top_led library. Firstly we need to include the library just like it was done in the line one of the snippet. Now we can use all of the functions from the app_top_led library.
When we want to use Smablo Top LED and Button Shield we need to initialize it first, to do that we need to use app_top_led_init(). Initialization functions need to used only once at the beginning of the program just like it was shown in the line 5 in listing above.
Then we can start to configure our shield to get the result that we want. We are doing that in the line 6 with app_top_led_configure_led_state().
Have in mind that the configuration functions do not send anything to the shield so that no changes will be applied until app_top_led_commit_blocking() function is called just like it was shown in the line 7 of the snippet. Commit functions send the new configuration to the shield over TWI and after its execution all changes will be applied.
How do I?
In these chapter we will show you some common things you can with the Top LED and Button Shield.
Turn on the LED
#include "app_top_led.h"
void example_func(void)
{
    app_top_led_init(); //initialize the shield
    //Turn the LED 0 on with green color
    app_top_led_configure_led_state(APP_TOP_LED_0,APP_TOP_LED_G,APP_TOP_LED_ON );
    //Send config over TWI
    app_top_led_commit_blocking();
}
We can turn the LED on or off with use of app_top_led_configure_led_state() function. First parameter is the LED ID. The second is the color we want to light up and the third is on or off state of the LED.
Blink LED
#include "app_top_led.h"
static const app_top_led_params_t example_params=
{
    .on_intensity=2,
    .on_time=2,
    .off_intensity=0,
    .off_time=2,
    .rise_time=0,
    .fall_time=0
};

void example_func(void)
{
    app_top_led_init(); //initialize shield
    //configure parameters
    app_top_led_configure_led_params(APP_TOP_LED_0,APP_TOP_LED_G, &example_params);
    //initialize turn the LED on
    app_top_led_configure_led_state(APP_TOP_LED_0,APP_TOP_LED_G,APP_TOP_LED_ON );
    app_top_led_commit_blocking(); //send over TWI
}
Blink with LED example show you how to make LED 0 blink with green color with use of app_top_led_configure_led_params() function and the example_params structure that will make the LED 0 blink with one second period.
More complex use and explanation of the app_top_led_params_t structure is explained later in app_top_led library.
You need to also turn on the proper LED with app_top_led_configure_led_state() and call app_top_led_commit_blocking() to send configuration to the Shield.
Set LED to chosen color
#include "app_top_led.h"
void example_func(void)
{
    //example yellow color structure
    app_top_led_color_t led_color;
    led_color.r = 30;
    led_color.g = 50;
    led_color.b = 0;

    app_top_led_init(); //initialize shield

    //configure parameters
    app_top_led_configure_led_color(APP_TOP_LED_0,&led_color);
    app_top_led_commit_blocking(); //send over TWI
}- initialize the LED with
app_top_led_init()function. - To make the LED display the color you desire use
app_top_led_configure_led_color()function that takes two parameters the id of the LED we want to set the color in our case LED 0APP_TOP_LED_0and the address of theled_colorstructure in which we are setting the intensity of the basic LED colors. - To send the configurations to the shield call
app_top_led_commit_blocking()
Make button do something
#include "app_top_led.h"
#include "nrf_log.h"

static void button_press_handler(app_top_led_button_id_t button_id)
{
    NRF_LOG_INFO("Button press.\r\n");
}

void example_func(void)
{
    // Smablo TOP LED & BUTTON Shield initialization function
    app_top_led_init();

    // Attach interrupt for button 0
    app_top_led_button_handler_attach(APP_TOP_LED_BUTTON_0, button_press_handler);

    // Send this configuration to the Smablo TOP LED & BUTTON Shield
    app_top_led_commit_blocking();
}
This code shows how to make button to print out information about button press, to see the print you need to use RTT Viewer.
Function app_top_led_button_handler_attach() takes user defined button press handler as parameter which in our case is button_press_handler().
Library reference app_top_led
To make your work with Smablo products easier and faster we prepared app_top_led library for use with Top LED and Buttons Shield. All of available functions and their descriptions can be found in app_top_led.h.
The functions in this library can be divided into 3 groups and to always expect proper work of the Smablo Top LED and Buttons Shield you should use them in this sequence:
- Initialization functions like
app_top_led_init()that should be used once at the beginning of your program, - Configuration functions like
app_top_led_configure_led_params()orapp_top_led_configure_led_state()that will configure our shield, but remember it’s all they do, configure functions won’t change anything until we will use the next type of functions - Commit functions like
app_top_led_commit_blocking()those functions will send all of the configurations made to shield. Only after executing this type of function you will see the change of behaviour of the Top LED and Buttons Shield.
So your code should look similar to the below snippet:
void example_func(void)
{
    app_top_led_init();
    app_top_led_configure_led_state(APP_TOP_LED_0,APP_TOP_LED_G,APP_TOP_LED_ON );
    app_top_led_commit_blocking();
}
The enumeration types and structures that will be required by the function are located on the top of the file, we will often come back to them to change the parameters of the on shield features.
app_top_led_init
Prototype:
void app_top_led_init(void)Function is used to initialize the shield. Use it once at the beginning of our program like in code snippet above.
app_top_led_configure_led_params
Prototype:
void app_top_led_configure_led_params(const app_top_led_id_t led_id, const app_top_led_type_t led_type, const app_top_led_params_t* const params)Function is used to configure parameters for LED using 3 parameters:
led_idwhich sets ID of LED we want to configure, it can take any of theapp_top_led_id_ttype value for exampleAPP_TOP_LED_0if we want to configure the ID0 LEDled_typethat sets the ID of the color we want the LED to be configured with, it can take any of theapp_top_led_type_ttype value for exampleAPP_TOP_LED_Gthat will set the red color on the LEDparamsis a pointer to populatedapp_top_led_params_tstructure which we need to create earlier
Thus the correct use of this function will look like below:
static const app_top_led_params_t example_params=
{
    .on_intensity=2,
    .on_time=2,
    .off_intensity=0,
    .off_time=2,
    .rise_time=0,
    .fall_time=0
};

void example_func(void)
{
    app_top_led_init(); //initialize shield
    //configure parameters
    app_top_led_configure_led_params(APP_TOP_LED_0, APP_TOP_LED_G, &example_params);
    //initialize turn the LED on
    app_top_led_configure_led_state(APP_TOP_LED_0,APP_TOP_LED_G,APP_TOP_LED_ON );
    app_top_led_commit_blocking(); //send over TWI
}
The example_params structure will make the LED 0 blink with one second period. More complex use of the app_top_led_params_t structure is explained in chapter 'Autonomous LED'
app_top_led_configure_led_state
Prototype:
void app_top_led_configure_led_state(const app_top_led_id_t led_id, const app_top_led_type_t led_type, const app_top_led_state_t led_state)Function is used to change the state of the LEDs or in simple words to turn the LEDs on or off.
This function takes 3 parameters:
led_idwhich sets ID of LED we want to configure, it can take any of theapp_top_led_id_ttype value for exampleAPP_TOP_LED_0if we want to configure the LED 0led_typethat sets the ID of the color we want the LED to be configured with, it can take any of theapp_top_led_type_ttype value for exampleAPP_TOP_LED_Gthat will set the red color on the LEDled_statethat using the types fromapp_top_led_state_tenum turns the LED on or off
app_top_led_configure_led_color
Prototype:
void app_top_led_configure_led_color(const app_top_led_id_t led_id, const app_top_led_color_t* const led_color)This function sets the desired intensity of the colors. Function take 2 parameters:
led_idwhich sets ID of LED we want to configure, it can take any of theapp_top_led_id_ttype value for exampleAPP_TOP_LED_0if we want to configure the ID0 LEDled_colorpointer to populated app_top_led_color_t type of structure. With this structure you can set any color combined with red, green and blue and apply white balance if needed. All of color intensity can be set from range (0-255). Have in mind that setting all of the color intensity parameter will turn the led off.
void example_func(void)
{
    //example yellow color structure
    app_top_led_color_t led_color;
    led_color.r = 30;
    led_color.g = 50;
    led_color.b = 0;

    app_top_led_init(); //initialize shield

    //configure parameters
    app_top_led_configure_led_color(APP_TOP_LED_0,&led_color);

    //initialize turn the LED on
    app_top_led_commit_blocking(); //send over TWI
}
You can combine the colors to create your own unique ones.
app_top_led_button_handler_attach
Prototype:
void app_top_led_button_handler_attach(const app_top_led_button_id_t button_id, const app_top_led_button_handler_t handler)This function is used to attach user defined function to the button press event. In simple words you can make on shield button to trigger any event you want. Function takes 2 parameters:
button_idthat identifies which button you want to trigger the event. It can take any of theapp_top_led_button_id_ttype for exampleAPP_TOP_LED_BUTTON_0,handlerthat is a pointer to the user function to be executed when the button is pressed. The handler need to beapp_top_led_button_handler_ttype.
You can see the example usage of this function here.
app_top_led_button_handler_detach
Prototype:
void app_top_led_button_handler_detach(const app_top_led_button_id_t button_id)This function is used to detach previously attached user defined function to the button. Function takes as a parameter the button_id identifier type of app_top_led_button_id_t that we want to detach from user defined function. You can use this function after app_top_led_button_handler_attach function.
app_top_led_commit
Prototype:
ret_code_t app_top_led_commit(app_top_led_callback_t callback)This function commits all of the configurations to the Shield in the asynchronous manner. The callback function need to be app_top_led_callback_t type. The example below is the same example that was used here but with use of asynchronous commit function. Below was shown how you can use the function. To see the printed message open RTT Viewer. You can see how to do that in video below.
//this will be called after all of the configuration was send to the shield
void led_callback(ret_code_t result_code)
{
    //print message
    NRF_LOG_RAW_DEBUG("configuration changes was send to the shield %d");
}

void example_func(void)
{
    app_top_led_color_t led_color;
    led_color.r = 30;
    led_color.g = 50;
    led_color.b = 0;

    app_top_led_init(); //initialize shield
    //configure parameters
    app_top_led_configure_led_color(APP_TOP_LED_0,&led_color);
    //commit the changes to the shield
    app_top_led_commit(led_callback);
}
app_top_led_get_color_by_type
Prototype:
uint8_t app_top_led_get_color_by_type(const app_top_led_color_t* const led_color, const app_top_led_type_t led_color_type)This function returns intensity of the color that was previously set. Function takes 2 parameters:
led_colorpointer to the previously defined structure in which one of its color we want to readled_color_typethat sets the ID of the color we want to get. It can take any of theapp_top_led_type_ttype value for exampleAPP_TOP_LED_Gthat will change the green color on the LED.
app_top_led_set_color_by_type
Prototype:
void app_top_led_set_color_by_type(app_top_led_color_t* const led_color, const app_top_led_type_t led_color_type, const uint8_t color_value)This function sets the specific color and its intensity in led_color structure. Function takes 3 parameters:
led_colorpointer to the previously defined structure in which one of its color we want to changeled_color_typesets ID of the color we want to change. It can take any of theapp_top_led_type_ttype value for exampleAPP_TOP_LED_Gthat will change the green color on the LEDcolor_valueintensity of the color we want to set value range (0-255)
Below is the example usage of the function. It's based on the example used here.
void example_func(void)
{
    app_top_led_color_t led_color;
    led_color.r = 30;
    led_color.g = 50;
    led_color.b = 0;

    app_top_led_init(); //initialize shield

    //change the intensity of green the color in led_color structure to 0
    //so there will be only red color intensity left
    //if you comment the line below the color will still be yellow
    app_top_led_set_color_by_type(&led_color,APP_TOP_LED_G,0);

    //configure parameters
    app_top_led_configure_led_color(APP_TOP_LED_0,&led_color);

    //commit the changes to the shield
    app_top_led_commit_blocking();
}
Advanced: Autonomous LED functions
In this chapter we will talk more about the autonomous feature of the LED on Smablo Top LED and Button Shield. app_top_led_configure_led_params function uses app_top_led_params_t structure.
With this structure we can tell the LEDs on the shield to blink fade or to stay on or off once and then for example they’re going to blink in accordance with the parameters we set in the structure without CPU control. The structure takes following parameters:
on_intensityis setting the intensity of the LED when it’s on value(0-255)-
on_timedeterminates the time that the LED will be on value(0-31)- 0-15: on_time = value/2 [s]
- 16-31: on_time = 512(value)255/32768 [s]
off_intensitydeterminates the minimum intensity that will be applied where value(0-7)- 0 is off
- Linear mode (default) : off_intensity = 4 x value
- Logarithmic mode (fading capable IOs only) : off_intensity = f(4 x value)
off_time(TOffX) time that LED will have the lowest intensity- 0: Infinite (Single shot mode, TOff directly controlled by RegData,
- 1 - 15: off_time = 64 value (255/32768) [s]
- 16 - 31: off_time = 512 value (255/32768) [s]
rise_timeFade In setting. When enabled the LED will set the intensity set in on_intensity parameter in time from equations below.- 0: OFF
- 1 - 15: rise_time = (on_intensity -(4 off_intensity )) value * (255/32768) [s]
- 16 - 31: rise_time = 16 (on_intensity -(4off_intensity)) value (255/32768) [s]
fall_timeFade out setting. When enabled the LED will set the intensity set in off_intensity parameter in time from equations below.- 0: OFF
- 1 - 15: fall_time = (on_intensity -(4off_intensity)) value* (255/32768) [s]
- 16 - 31: fall_time = 16 (on_intensity -(4off_intensity)) value (255/32768) [s]
For more information about this feature see the sx1509b datasheet page 18. To show you how to use this feature we prepared 2 structures that you can use in your own projects.
///LED presets configuration
#define LED_ON_INTENSITY 20
#define LED_ON_TIME 2
#define LED_OFF_TIME 2
#define LED_RISE_TIME 2
#define LED_FALL_TIME 2

/**
       \brief Example structure for breathing led
*/
static const app_top_led_params_t led_breathe_params=
{
    .on_intensity=LED_ON_INTENSITY,
    .on_time=LED_ON_TIME,
    .off_intensity=0,
    .off_time=LED_OFF_TIME,
    .rise_time=LED_RISE_TIME,
    .fall_time=LED_FALL_TIME
};

/**
       \brief Example structure for blinking led
*/
static const app_top_led_params_t led_blink_params=
{
    .on_intensity=LED_ON_INTENSITY,
    .on_time=LED_ON_TIME,
    .off_intensity=0,
    .off_time=LED_OFF_TIME,
    .rise_time=0,
    .fall_time=0
};
The first one: led_breathe_params will make the LEDs fade in and fade out. Similar situation was shown on diagram below:
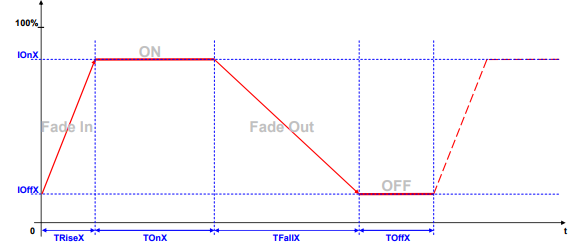
So in accordance to the formulas our fading parameters looks like this:
on_intensityis set to 20on_time1soff_intensity0off_time0.99srise_time0.31sfall_time0.31s
Our LED will be on 1s then will fade out in 0.31s, be off 0.99s and then fade in in 0.31s.
The second structure led_blink_params will make the LED blink and as you can the parameters are similar to the previous one but rise_time and fall_time are zero so there will be no fading.
Smablo Top LED and Buttons shield is making all the fading and blinking on their own without any interaction from the CPU until new fading or blinking configuration is needed. Thanks to this we are saving the CPU power for use in other tasks but this method has also some disadvantages. We can only do fading and blinking with blue color , only blinking with green color and the red color can be only set on or off.
All of available functions and their descriptions can be found in app_top_led.h or by pressing F12 button when on them.